VUE3-入门demo
VUE3-入门demo
记录vue学习时的一些基础demo,我的学习路线规划是先简单上手了解vue再深入打基础
风格统一采用的是:组合式API+单文件组件
学习资源为vue官方文档
ref/reactive创建响应式状态
reactive() 只适用于对象 (包括数组和内置类型,如 Map 和 Set)。而另一个 API ref() 则可以接受任何值类型。ref 会返回一个包裹对象,并在 .value 属性下暴露内部值
在组合式 API 中,推荐使用 ref() 函数来声明响应式状态
ref() 接收参数,并将其包裹在一个带有 .value 属性的 ref 对象中返回
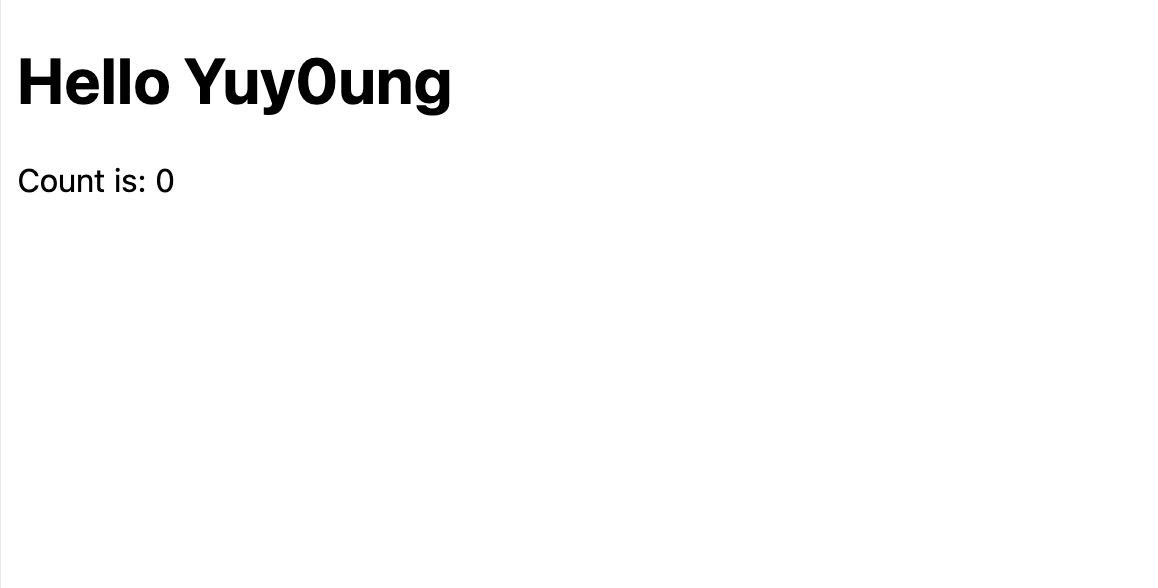
创建响应式状态:
<script setup>
import { ref,reactive } from 'vue'

// 组件逻辑
// 此处声明一些响应式状态
  const message = ref('Hello Yuy0ung')
  const counter = reactive({
    count:0
  })

</script>

<template>
  <h1>{{message}}</h1>
  <p>Count is: {{ counter.count }}</p>
</template>
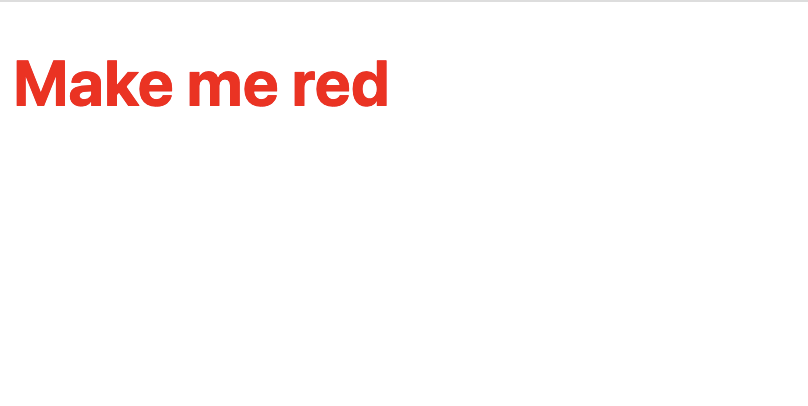
Attribute 绑定
mustache 语法 (即双大括号) 只能用于文本插值。为了给 attribute 绑定一个动态值,需要使用 v-bind 指令,简写为:
比如这里给标题绑定红色属性:
<script setup>
import { ref } from 'vue'

const titleClass = ref('title')
</script>

<template>
  <h1 :class="titleClass">Make me red</h1> <!-- 此处添加一个动态 class 绑定 -->
</template>

<style>
.title {
  color: red;
}
</style>
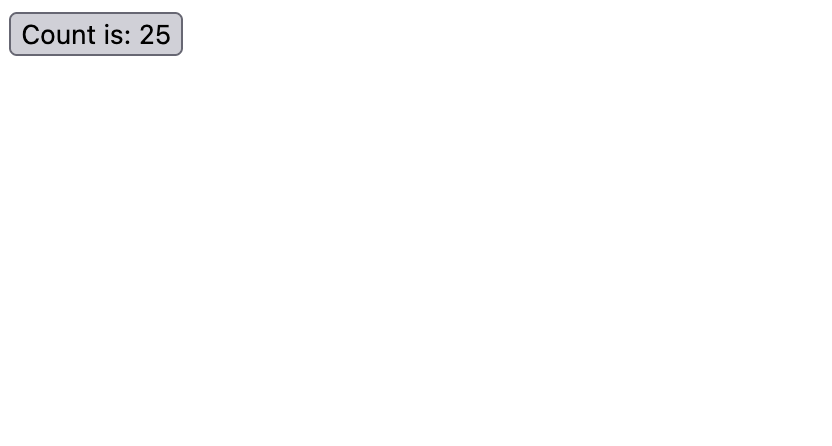
事件监听
使用 v-on 指令监听 DOM 事件,简写为@
实现点击增加按钮的count:
<script setup>
import { ref } from 'vue'

const count = ref(0)

function pluscount() {
  //自增,更新组件状态
  count.value++
}
</script>

<template>
  <!-- 使此按钮生效 -->
  <button @click="pluscount">Count is: {{ count }}</button>
</template>
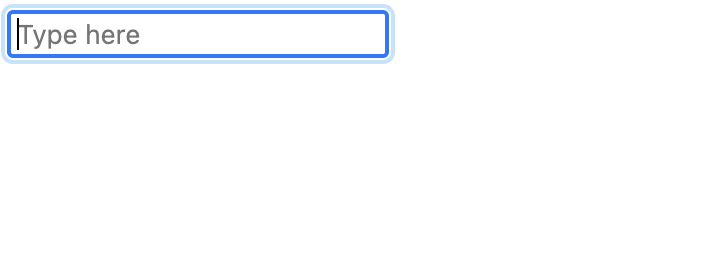
表单绑定
可以同时使用 v-bind 和 v-on 来在表单的输入元素上创建双向绑定,但为了简化双向绑定,Vue 提供了一个 v-model 指令
使用如下,如此实现一个输入框:
<script setup>
import { ref } from 'vue'

const text = ref('')
</script>

<template>
  <input v-model="text" placeholder="Type here">
  <p>{{ text }}</p>
</template>
条件渲染
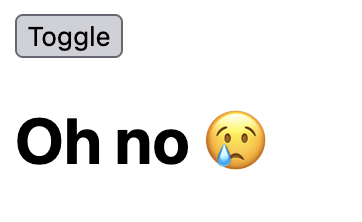
使用 v-if 指令来有条件地渲染元素:
比如这里通过点击按钮来切换显示文本
<script setup>
import { ref } from 'vue'

const awesome = ref(true)

function toggle() {
  awesome.value = !awesome.value
}
</script>

<template>
  <button @click="toggle">Toggle</button>
  <h1 v-if="awesome">Vue is awesome!</h1>
  <h1 v-else>Oh no 😢</h1>
</template>
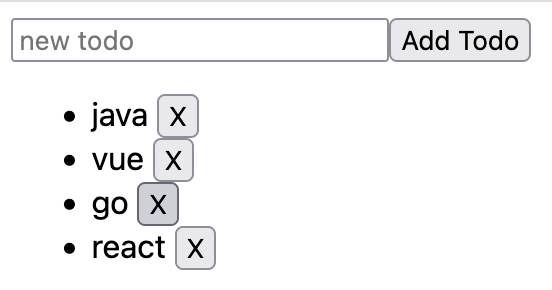
列表渲染
可以使用 v-for 指令来渲染一个基于源数组的列表:
<ul>
  <li v-for="todo in todos" :key="todo.id">
    {{ todo.text }}
  </li>
</ul>
这里的 todo 是一个局部变量,表示当前正在迭代的数组元素。它只能在 v-for 所绑定的元素上或是其内部访问,就像函数的作用域一样
每个 todo 对象设置了唯一的 id,并且将它作为特殊的 key attribute 绑定到每个 <li>
更新列表有两种方式:
- 在源数组上调用变更方法:
todos.value.push(newTodo)
使用新的数组替代原数组:
todos.value = todos.value.filter(/* ... */)
利用这个可以写出一个todolist工具:
<script setup>
import { ref } from 'vue'

// 给每个 todo 对象一个唯一的 id
let id = 0

const newTodo = ref('')
const todos = ref([
  { id: id++, text: 'Learn HTML' },
  { id: id++, text: 'Learn JavaScript' },
  { id: id++, text: 'Learn Vue' }
])

function addTodo() {
  todos.value.push({ id: id++, text: newTodo.value },)
  newTodo.value = ''
}

function removeTodo(todo) {
  todos.value = todos.value.filter((t)=>t!=todo)
}
</script>

<template>
  <form @submit.prevent="addTodo">
    <input v-model="newTodo" required placeholder="new todo">
    <button>Add Todo</button>
  </form>
  <ul>
    <li v-for="todo in todos" :key="todo.id">
      {{ todo.text }}
      <button @click="removeTodo(todo)">X</button>
    </li>
  </ul>
</template>
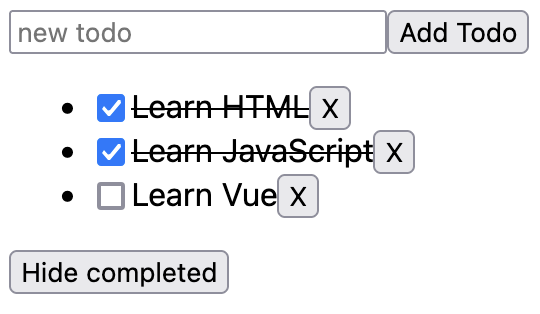
计算属性
使用apicomputed(),可以创建一个能根据其他数据来改变自身value的ref
比如下面的todolist的每个list可以根据自身是否完成来进行分类隐藏:
<script setup>
import { ref,computed } from 'vue'

let id = 0

const newTodo = ref('')
const hideCompleted = ref(false)
const todos = ref([
  { id: id++, text: 'Learn HTML', done: true },
  { id: id++, text: 'Learn JavaScript', done: true },
  { id: id++, text: 'Learn Vue', done: false }
])

const filteredTodos = computed(() => {
  // 根据 `todos.value` & `hideCompleted.value`
  // 返回过滤后的 todo 项目
  return hideCompleted.value?
    todos.value.filter((t)=> !t.done):
  	todos.value
})

function addTodo() {
  todos.value.push({ id: id++, text: newTodo.value, done: false })
  newTodo.value = ''
}

function removeTodo(todo) {
  todos.value = todos.value.filter((t) => t !== todo)
}
</script>

<template>
  <form @submit.prevent="addTodo">
    <input v-model="newTodo" required placeholder="new todo">
    <button>Add Todo</button>
  </form>
  <ul>
    <li v-for="todo in filteredTodos" :key="todo.id">
      <input type="checkbox" v-model="todo.done">
      <span :class="{ done: todo.done }">{{ todo.text }}</span>
      <button @click="removeTodo(todo)">X</button>
    </li>
  </ul>
  <button @click="hideCompleted = !hideCompleted">
    {{ hideCompleted ? 'Show all' : 'Hide completed' }}
  </button>
</template>

<style>
.done {
  text-decoration: line-through;
}
</style>
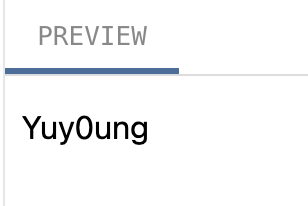
生命周期、模板引用
当我们无法使用响应式渲染来进行dom更新的时候,可以尝试使用模板引用,也就是指向模板中一个 DOM 元素的 ref
<p ref="pElementRef">hello</p>
访问这个引用需要先定义,并且使用null初始化:
const pElementRef = ref(null)
模板引用 ref 只能在组件挂载后访问,挂载后执行代码使用onMounted
import { onMounted } from 'vue'

onMounted(() => {
  // 此时组件已经挂载。
})
这被称为生命周期钩子——它允许我们注册一个在组件的特定生命周期调用的回调函数。还有一些其他的钩子如 onUpdated 和 onUnmounted
比如下面添加一个onMounted钩子,修改dom的文字:
<script setup>
import { ref,onMounted } from 'vue'

const pElementRef = ref(null)

onMounted(() => {
  pElementRef.value.textContent = 'Yuy0ung'
})
</script>

<template>
  <p ref="pElementRef">Hello</p>
</template>
侦听器
侦听数据源的改变:
watch() 可以直接侦听一个 ref,并且只要 count 的值改变就会触发回调。watch() 也可以侦听其他类型的数据源
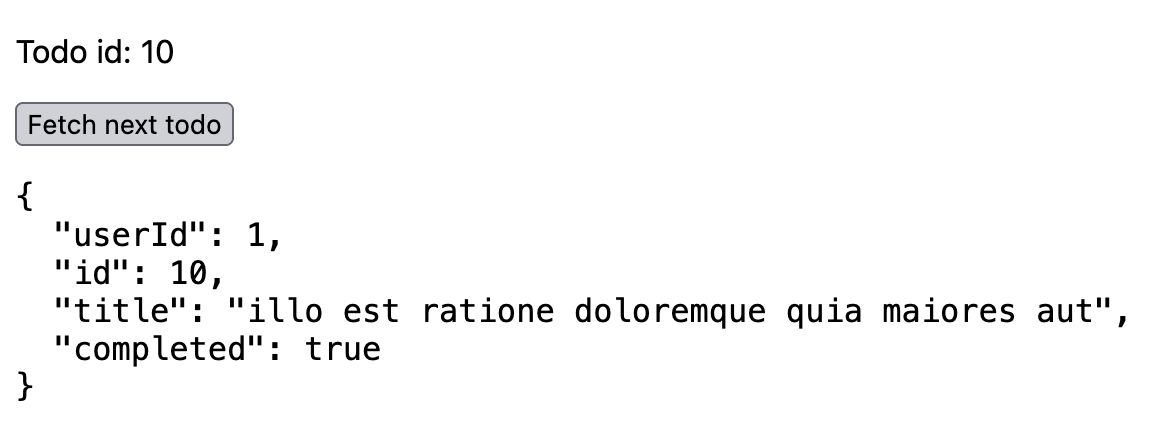
比如这里监听显示id的变化来触发获取新的data:
<script setup>
import { ref,watch } from 'vue'

const todoId = ref(1)
const todoData = ref(null)

async function fetchData() {
  todoData.value = null
  const res = await fetch(
    `https://jsonplaceholder.typicode.com/todos/${todoId.value}`
  )
  todoData.value = await res.json()
}

  fetchData()
watch(todoId,fetchData)
</script>

<template>
  <p>Todo id: {{ todoId }}</p>
  <button @click="todoId++" :disabled="!todoData">Fetch next todo</button>
  <p v-if="!todoData">Loading...</p>
  <pre v-else>{{ todoData }}</pre>
</template>
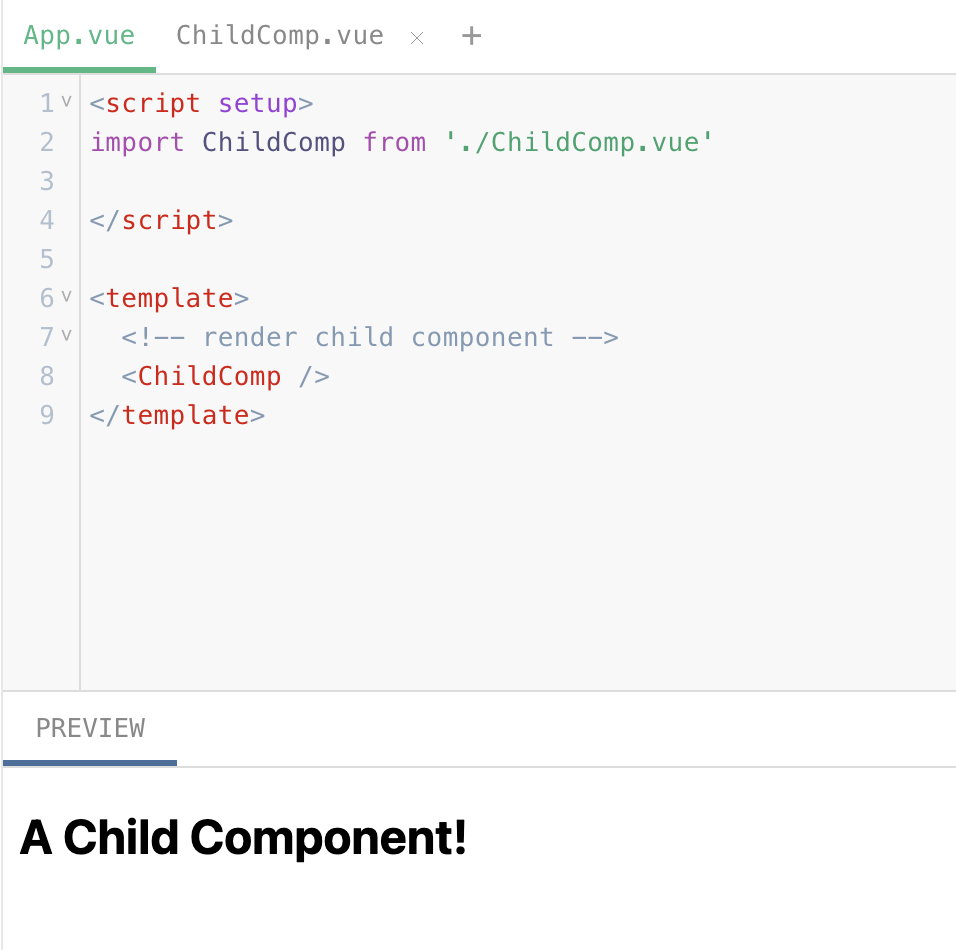
组件
导入子组件:
import ChildComp from './ChildComp.vue'
在模板中使用:
<ChildComp />
这是原本的组件ChildComp.vue:
<template>
  <h2>A Child Component!</h2>
</template>
App.vue中引入ChildComp.vue作为子组件:
<script setup>
import ChildComp from './ChildComp.vue'

</script>

<template>
  <!-- render child component -->
  <ChildComp />
</template>
props
子组件可以通过 props 从父组件接受动态数据。首先,需要声明它所接受的 props:
<!-- ChildComp.vue -->
<script setup>
const props = defineProps({
  msg: String
})
</script>
注意 defineProps() 是一个编译时宏,并不需要导入。一旦声明,msg prop 就可以在子组件的模板中使用。它也可以通过 defineProps() 所返回的对象在 JavaScript 中访问。
父组件可以像声明 HTML attributes 一样传递 props。若要传递动态值,也可以使用 v-bind 语法:
<ChildComp :msg="greeting" />
比如子组件使用pros:
<script setup>
const props = defineProps({
  msg: String
})
</script>

<template>
  <h2>{{ msg || 'No props passed yet' }}</h2>
</template>
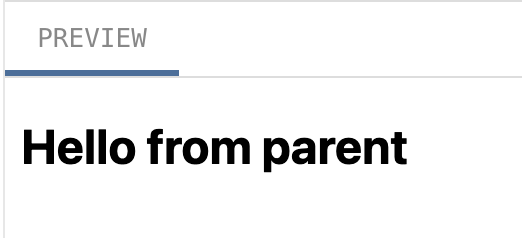
父组件:
<script setup>
import { ref } from 'vue'
import ChildComp from './ChildComp.vue'

const greeting = ref('Hello from parent')
</script>

<template>
  <ChildComp :msg="greeting" />
</template>
这样子组件就能接收父组件的动态值:
emits
除了接收 props,子组件还可以向父组件触发事件:
<script setup>
// 声明触发的事件
const emit = defineEmits(['response'])

// 带参数触发
emit('response', 'hello from child')
</script>
emit() 的第一个参数是事件的名称。其他所有参数都将传递给事件监听器。
父组件可以使用 v-on 监听子组件触发的事件——这里的处理函数接收了子组件触发事件时的额外参数并将它赋值给了本地状态:
<ChildComp @response="(msg) => childMsg = msg" />
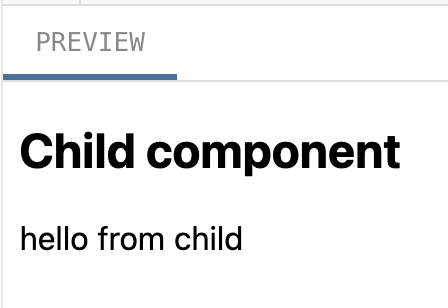
比如这里父组件定义函数:
<script setup>
import { ref } from 'vue'
import ChildComp from './ChildComp.vue'

const childMsg = ref('No child msg yet')
</script>

<template>
  <ChildComp @response="(a) => childMsg = a"/>
  <p>{{ childMsg }}</p>
</template>
子组件触发函数:
<script setup>
const emit = defineEmits(['response'])

emit('response', 'hello from child')
</script>

<template>
  <h2>Child component</h2>
</template>
父组件成功接收到子组件传递给response函数的参数:
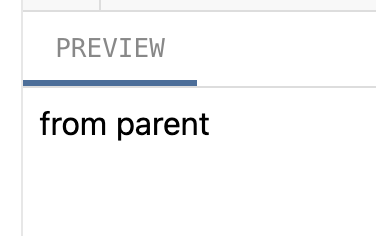
插槽 (slots)
除了props,父组件还可以通过插槽 (slots) 将模板片段传递给子组件
子组件创建一个插槽出口(slot outlet):
<template>
  <slot>Fallback content</slot>
	<!-- 上面文本为“默认”内容:它会在父组件没有传递任何插槽内容时显示 -->
</template>
父组件直接传递:
<script setup>
import { ref } from 'vue'
import ChildComp from './ChildComp.vue'

const msg = ref('from parent')
</script>

<template>
  <ChildComp>{{msg}}</ChildComp>
</template>
总结
完成了vue的基础api学习,以及其简单使用,但仅能用于入门的基本学习,接下来还需要继续阅读深入指南,并针对常用场景勤加练习